Making the Golf ball
Hello in this tutorial I will show you how to create and texture a golf ball. This is an easy and convinient way to make your own golf ball. I will explane everithing clear enough so everybody coild understand it.I want to say that used 3Dmax 7 to create this tutorial but you could do it even with max 3 or 4.
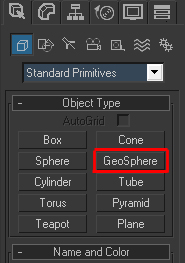
Ok let’s get started.First start 3D max then go to the create panel and press GeoSpere.
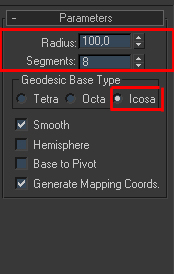
Set it to icosa, radius:100 and segments to 8.
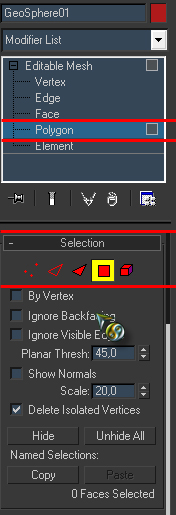
Now the fun part begins.Right click on the ball select Conver to/Editable mesh Now select polygon.
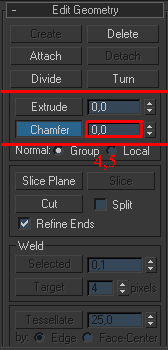
Now from the edit meny press SELECT ALL that will select the entire geosphere.Now from the sub-object press edge and again choose Select all from the edit meny.Now press the Chamfer on the Edit Geometry.I think you should add an amout of 4.5 or 5 just see what suits best.
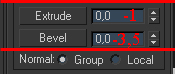
Now go back to the polygon go to the edit meny and choose Select Invert this will select the edges that we created in the previous step.Add extrude amount of about -1 and the Bavel about 3.5 – 4.
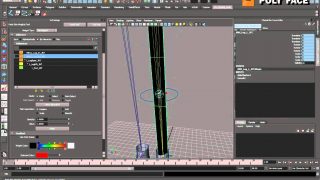
Now all you have to add is a MeshSmooth modifier
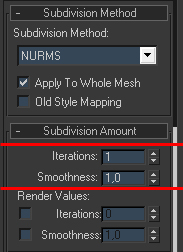
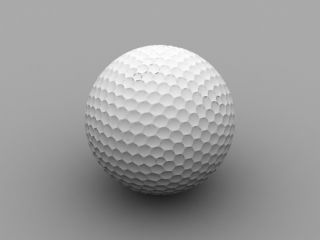
in the interations press 1.Afte you render you should have something like in the picture.
Now for the texturing.This maybe the easiest way to texture a golf ball.I decided to do it this way because this is the first thing that a beginner should learn about texturing.OK the first thing you need is a texture I created my own in Photoshop.You can make your own texture or use mine just make the tutorial.

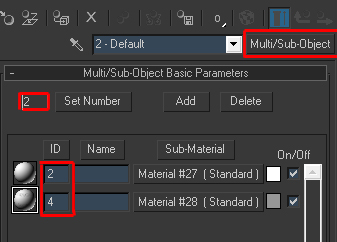
You just need to select the area of polygons where you want your texture to be then go to the bottom of the editable mesh modifier and change the the set ID to 4 after that just press UVW map from the modifier list.You have to creat a material for the ball open the material editor by simply pressing ‘m’ on the keybord.Now select the first material and choose Multy/Sub-object change the material amount to 2 and under Material ID choos 2 for the first material and 4 for the second.
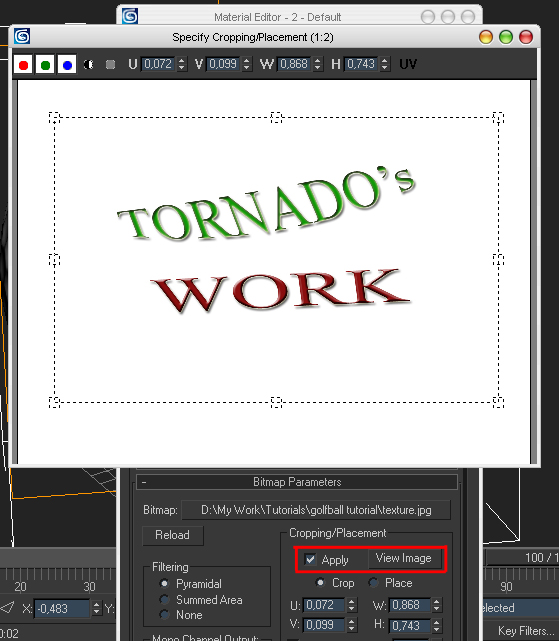
Select the first material and just set the defuse color to White R:255 G:255 B:255.Then go to the second material and after defuse color there is a small box press it and select Bitmap browse your hard and choose your texture.You could change the proportions of your texture by using crop but don’t forget to check the apply box.
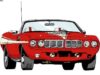
After you are finished you should have something like the picture bellow.

if you want to contact me just mail me at tornadooo2@yahoo.com


About The Author
You might be interested in