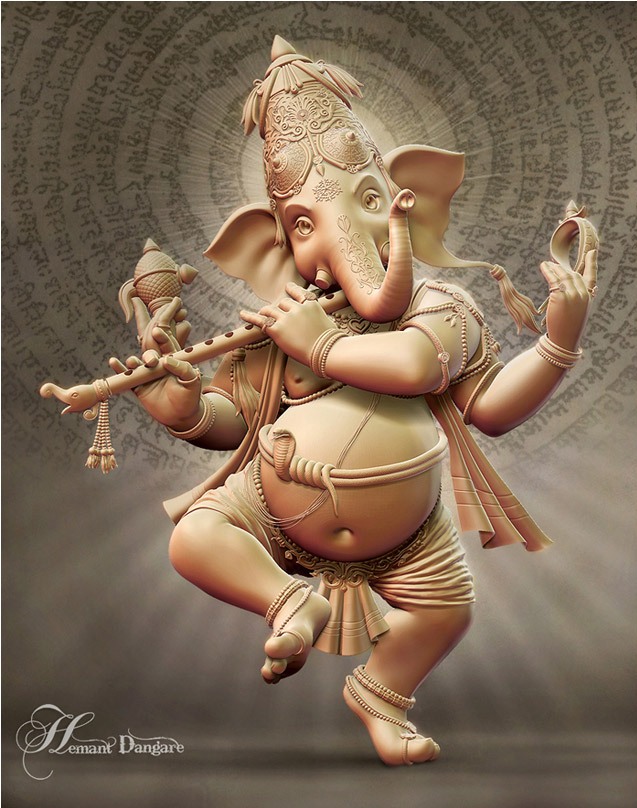
Making Of ‘Ganesha – God Of Wisdom’
In this tutorial Hemant Dangare shows us how he was making “ Ganesha” , the god with the face of an elephant.

Introduction
I grew up in a simple Indian family that lived by devoutly religious values. That every act was to be performed while keeping in mind the values and blessings of the divine force was taught to us right from the beginning. In our culture every religious function, festive celebration or holy or new endeavor begins with the invocation of Ganesha, the god with the face of an elephant. To be honest, I’ve had a stronge affiliation with him ever since I can remember. So it was, I now feel, a very obvious progression for me that further on in my life, when I grew up to become a CG modeler, my first choice would be to model him. One can see it as my humble offering to the divine power.
When I finally summed up enough courage to begin this gigantic work, I decided that I wanted to create a detailed statue of Lord Ganesha, which would simultaneously evoke his divinity. I wanted to sculpt him and bring him out the way I grew up seeing him in my mind, which made the effort all the more difficult. But as they say, “If you think you can, you can”… and so began the journey.
Before I started to model, I went through lots of reference images of Ganesha idols. After having studied them, I did some basic doodling and finally came up with what I have modeled. The entire model was primarily done in Maya. My life would have been easier had I been using ZBrush for all the intricate detailing of the accessories, but I wanted to enjoy the challenge of working with Maya.
STEP 1
I took a cube and started to roughly block out the shape of the body (Fig.01 – 02).

Fig.01

Fig.02
STEP 2
After I got the basic T pose shape, I fixed the second set of arms from the back of the shoulder in a way that it wouldn’t look disproportionate (Fig.03

Fig.03
STEP 3
After blocking the body, I focused on the head and gradually brought it to a shape that matched the look that I had visualized (Fig.04).

Fig.04
STEP 4
When I was happy with the blocking, I did a basic rigging and posed Ganesha in this happy dancing pose. To get the hands posed correct, I took a cylinder and treated it as a flute and posed the fingers to hold it (Fig.05 – 06).

Fig.05

Fig.06
STEP 5
After this, I started blocking the accessories. The accessories were the most complicated part of the sculpt. Aesthetically, I wanted to make them look perfect (Fig.07 – 08).

Fig. 07

Fig.08
STEP 6
I concentrated on all the intricate details of the crown, rings, weapons, bangle and the nose embellishments etc (Fig.09 – 10).

Fig.09

Fig.10
STEP 7
Later, with the help of the Lattice tool, I fixed the accessories to the statue (Fig.11 – 12).

Fig.11

Fig.12
STEP 8
After finishing all the modeling in Maya, I finally took the entire mesh into ZBrush. I tried to achieve a sense of rhythm and balance in the pose by using the Transpose Master, which I thought was lacking in the posing done in Maya. I also added volume to the body (Fig.13).

Fig.13
I also did made some changes to the modeling in terms of detailing the draperies and the snake (Fig.14 – 16).

Fig.14

Fig.15

Fig.16
STEP 9
Once I was happy with the model, I started experimenting with different materials in ZBrush to see which one was going to work well with the statue (Fig.17 – 18).

Fig.17

Fig.18
STEP 10
Finally I zeroed it down to an earthly-looking metacap. I chose that one because I felt that it gave me a calm and subtle look. I brought it back into Maya and started making a shader, which would resemble the one I’d chosen in ZBrush (Fig.19).

Fig.19
STEP 11
The reason for doing the shader in Maya was that, in ZBrush, I was not getting much control over the lighting. For me, controlling the lights was much easier in Maya (Fig.20).

Fig.20
Simultaneously I was working on the lights. I just used a basic three-point lighting setup (Fig.21).

Fig.21
STEP 12
After doing some tweaks in Maya and Photoshop, I finally achieved the look that I was aiming for (Fig.22).

Fig.22
STEP 13
Now it was time to do compositing in Photoshop. I painted different kinds of backgrounds to see which would go best with the model (Fig.23 – 24).

Fig.23

Fig.24
STEP 14
Then, to bring out the spiritual fervor, I added the Sanskrit verses in the background (Fig.25).

Fig.25
STEP 15
To finish it up and portray the divinity of my benign lord, I added the rays (Fig.26).

Fig.26
So this is the short description of my month’s-long story of the making of Ganesha – Lord of Wisdom. I am grateful to the 3DTotal team for honoring me by featuring my work. I hope that my Making Of write-up will help the readers and my fellow artist friends to understand my efforts better and that they will guide me with their precious suggestions further on.
Before I end, I would like to thank my family and a few of my friends, namely Antara Bakshi and Sanchari Bakshi, for helping me throughout in the making of Ganesha.


About The Author
You might be interested in