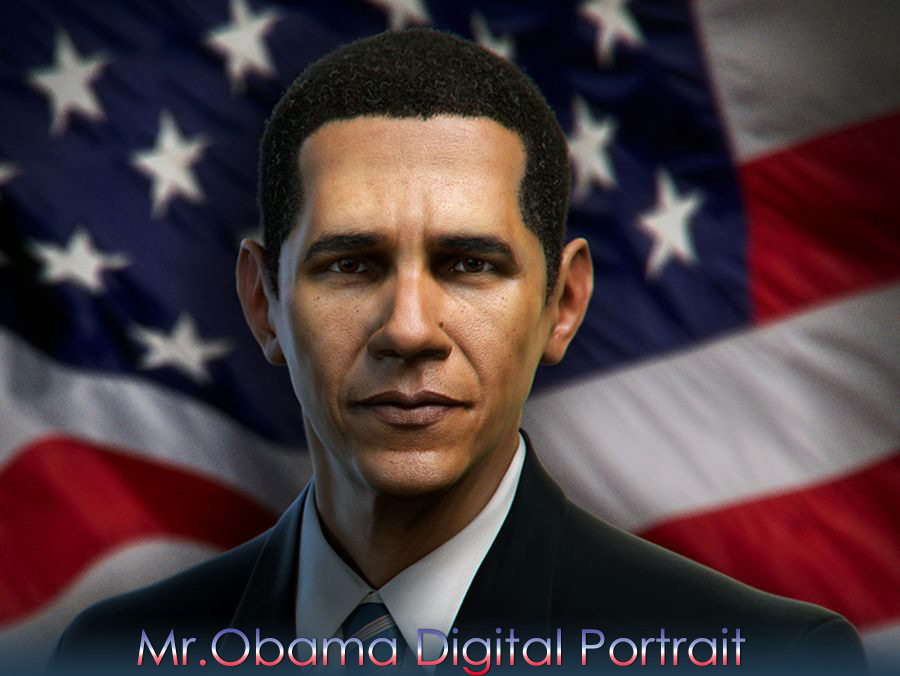
Making of Mr.Obama Digital Portrait
Since my project was related to well known public person finding good references was easy task but it was impossible to find images that could be useful for assembling good image plains so i relied mostly on eyeballing techniques.
|
Hi my name is Toni and i am going to walk you trough process of making digital portrait. Base MeshWith all my personal project I try to learn as much as I can so I often change pipeline and workflow as well. Don’t be afraid to try some new techniques and apps since technology is growing every day giving us opportunity to work more efficiently. In this project I will be switching between Maya, ZBrush, Silo, Uv layout and Photoshop. First thing I did was building simple base mesh in Silo using smoothed cube primitive and extruding few faces from bottom to make neck volume and shoulders. You can see Silo base mesh in figure below |
|
|
| Than I import base mesh as .obj file in ZBrush and started the sculpting. In this stage I was focused on overall shape and volume of model and I was not concerned with likeness features. My goal was to make good human bust sculpt and build new topology over that hi-res sculpt. That way I can have more efficient edge flow for further sculpting. ZBrush mesh base sculpt is presented in figure below. |
 |
| When it comes to remeshing your sculpt there is many good solutions. I could use ZBrush Z-sphere or even Topogun but I’ve decided to do it in Silo which also have some nice tools for that task. After laying down new topology I quickly realigned my base mesh with reference image using move brush in Silo. After half hour of pushing and pulling I had good base mesh with some decent percent of likeness I can further refine in ZBrush. |
|
|
| Have to revisit it later. In sculpting process mesh can be deformed behind point where your polygons align with distortion free UV’s so I will revisit this problem. Before adding more details to mesh I often do UV part. For that task I use great app called UV layout. I don’t spent much time on UV’s at this point because I will do it after completing this model.
For well trained artist task of building base mesh in such way can take between 1-2 hours. This mesh can be used in many other project because it have god mesh structure and volume. |


SculptingAfter building base mesh I imported this new base in ZBrush for further refining and sculpting. Be sure to focus on overall shape and volume of model instead of fine detail. Both overall shape and details are equally important but at first stage I suggest you to stay at lower subdivision levels and make good use of every edge and polygon before stepping up to higher level. |
 |
TexturingFor texturing part I use texture projecting techniques. Many people think that ZBrush can only paint on poly’s but using projection master you can actually project your painting directly on texture. For my model I have used 4k size textures. Here is quick explanation of workflow in this technique:
For more tips about Zapplink check www.zbrushcentral.com |
|
|
| After saving your Photoshop work go back to ZBrush and your texture will be projected on the ZBrush canvas over your model exactly you made it in PS. Because you are now in projection master, press G again to pick up your projection. After couple of seconds your projection will be baked on to your texture. Repeat this process few more times but with different angles and save those textures as different files. Now you can stitch those projections together in Photoshop. From basic color texture I made six different textures such as epidermal and subdermal, specular, bump and so on. |
 |

|
Scale of the model is one of the important things that must be well tuned because subsurface scattering weights relies on scale of your model. If you are not sure how to adjust scale of your model in Maya or max here is tip.
HairFor the short hair I use Maya fur. I don’t have any particular tips for Maya Fur, only thing is when you test fur be sure to turn off all shadows because it can take long time to render specially with raytracing shadows. Here is hair setup: |
 |
Lighting and RenderingFor the final rendering I use high density mesh since I am doing still image and I don’t care if model will be animatable. Rendering is the part which I find most time consuming because it takes a lot of test to come up with good relations between lights and shaders. Every test I did took between 3 – 15 minutes. For the lights I have used 4 lights… |
 |
| Two back lights are colorized, one slightly blue and other yellow. Main key light comes from the side and above and I have one big aerial light in front of the model for key light. I set two area lights that are not illuminating scene but they are only visible in reflections (for the eye). All of the lights in my setup are area lights because they produce nice soft shadows but in cost of more render time. |
|
|
I hope you have enjoyed this "making of" for any further explanations feel free to contact me. Sincerely, Anto Juričić Toni.
Related linksEmail: monty.band@gmail.com Profile: grapix.3dm3.com Portfolio: anto-toni.cgsociety.org/gallery/ |


About The Author
You might be interested in