CLOSE
There is a toy plane that we are going to create material for it
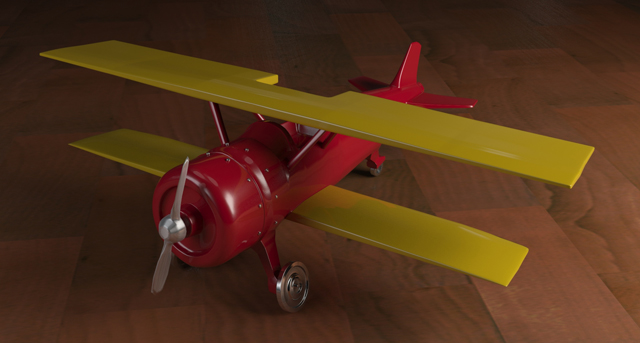
Also we need to prepare our scene for rendering and set lights. In fact this little toy plane that modeled by my Chinese friend han cun zhi (韩存智) is an excuse for introducing some of the mental ray techniques in 3dsmax. Download Scene
The background is not very important here but as a common way you can create a plane as your ground. I create a very big one and applied a wood material on it.- For lighting the scene, I have used Photometric lights. My reason is that Photometric light can
give me accurate result and also I have more control over my light and its temperature. In the picture you can see that I used two Photometric Free Lights and also you can see setting of each one.
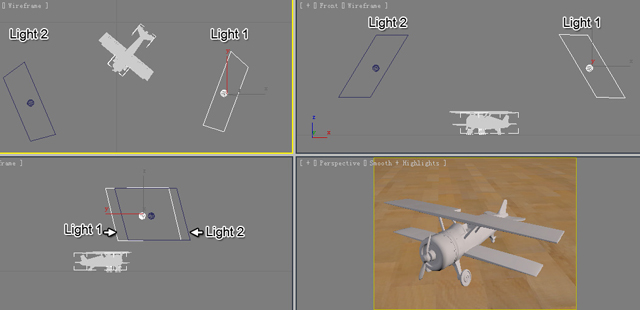
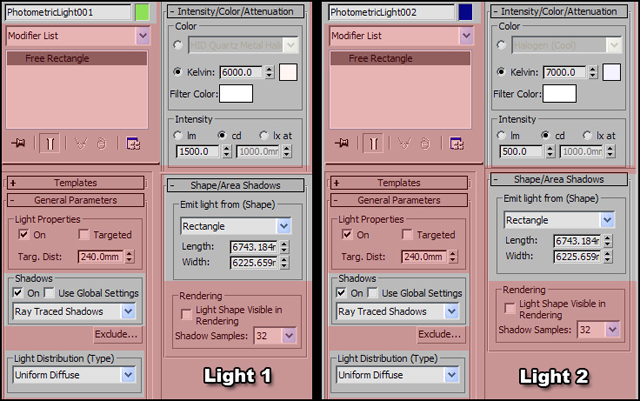
Just a short explanation over my lights settings:
— I used “rectangle” as emit light shape and changed its length and width. Be careful to not change the size of rectangle shape by “Scale” tool.
— From the “light distribution” list I picked “Uniform diffuse”. In this mode, light rays just distributed in a hemisphere. We do not need to light back of the light source. So “uniform diffuse” mode will help to focus light rays in front of light source.
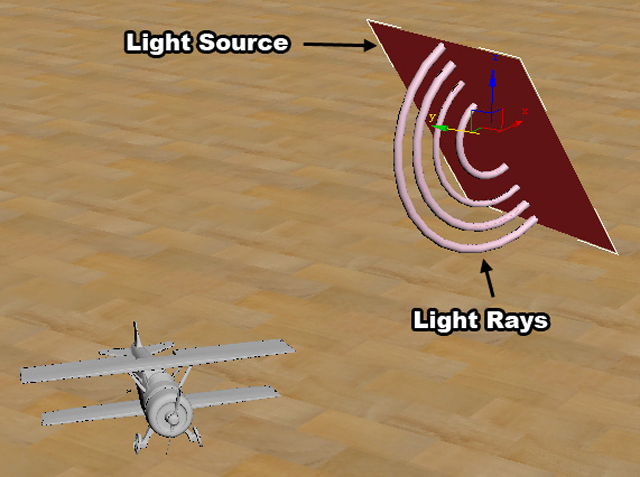
“Ray Traced Shadows” support Mental Ray and transparency so I used it. Maybe you ask why I did not try “Mental Ray Shadows map” which can be work with mental ray quicker. My reason is that Ray traced shadow is slower but is more accurate.
— For color of your lights you can select one of the lamp presets from light drop down list or set Kelvin temperature.
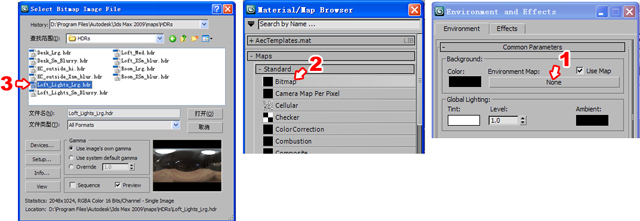
As far as our materials have high reflection, it is better to use an HDR image as environment. Click on the Environment in the Rendering menu. Environment dialog will appear. Click on the “environment Map” slot which labeled “None”. Material/map browser will open. Here double click on the “Bitmap”. Now from browsing dialog, choose an HDRI file. I use one which provide by 3dsmax software.
While Environment dialog is Open, click on the Material Editor button to open it too. Now click and drag your HDRI map to one of the free sample slots in the material editor. Make sure you are using Instance copy. The only thing you need to do in material editor is changing Mapping from “Screen” to “Spherical Environment”.
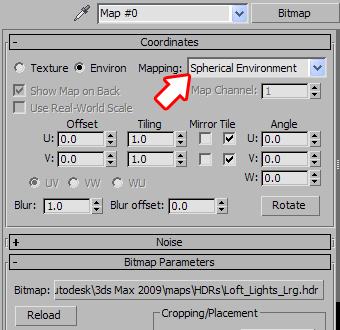
Now the scene is ready and we can create our materials.
First I want create a metal material for body of this toy plane. I used “Arch & Design” material because it can mimic the real world materials easier. You can see my material settings in the picture.
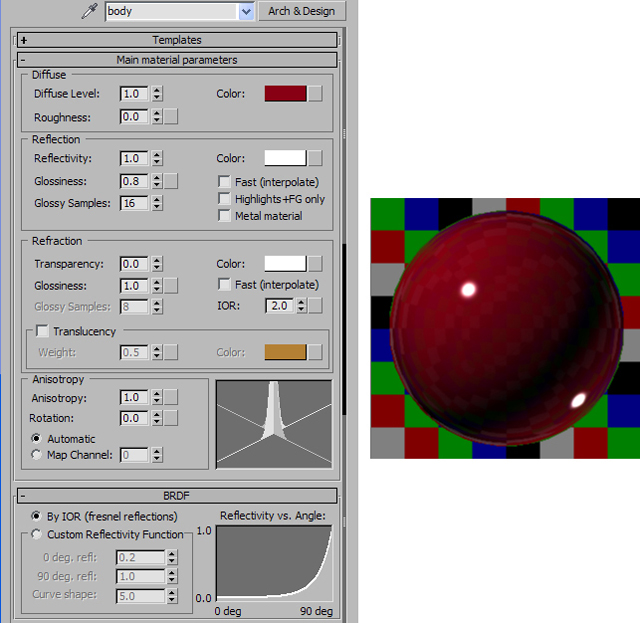
Let me briefly explain my settings:
— I used red as color of plane’s body
— Set “Reflectivity” to “1” because it is a metallic material and has high reflection.
— “Glossiness” I reduce to “0.8” to make material blurry. if it be “1” then result is a high reflective material and as much as you decrease it, it will be more blurry. Note this also, when you decrease “Glossiness” (make it lower than 1), “Glossy Sample” field will be active. Here you can change quality of glossiness.
— In BRDF rollout, I use “By IOR (Fresnel Reflection)” instead of custom reflectivity. If you want to know what Is Fresnel law, I suggest you to search in the internet and read articles about this French physicist and his Fresnel law.
After this I changed IOR value to 2. IOR is short for Index of refraction. You can find IOR values for different materials by searching in internet.
Now the question is that, my material is metal and I do not have any refraction. Then why I need to ser “index of refraction” (IOR)?
Answer: in fact this material is just pigment that covers a metal surface. When the light hit this surface, some rays could refract in to the surface and bounce off there. These rays will bring the color of pigment. Also some rays directly reflected. These rays cannot carry colors and just show reflection on the surface.
Wing material is also the same as body material just the color I changed to yellow.
Now is time for material of the wheels. I have used another mental ray “Arch & Design” material and you can see my setting in the picture.
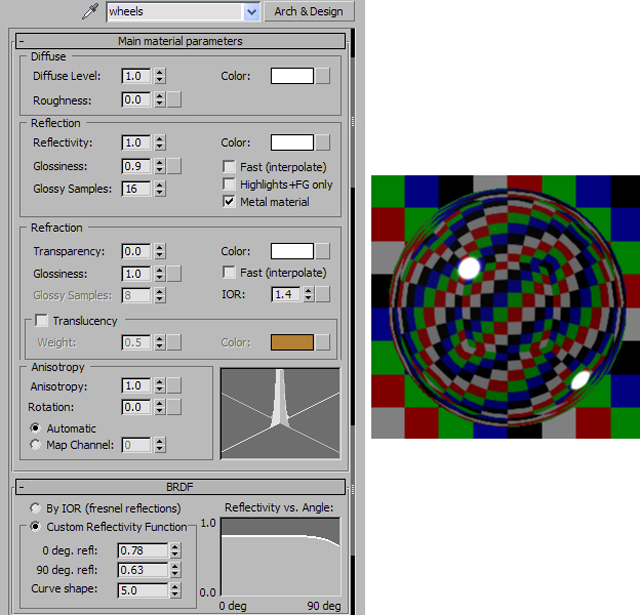
Let discuss about this material:
— This time in BRDF rollout I used “Custom Reflectivity Function” and changed 0 and 90 degree reflectivity. “0 deg. refl” means how much reflection could see in the surfaces that are facing to camera (or rendering view). “90 deg. refl” as its name is hinting means the amount of reflection on the edges. For the two previews materials I used IOR which means more reflection on the edges and less on the facing. But for wheels I want use a chrome material and I need have more reflection in front of rendering view. So I have changed BRDF same as what you saw in the picture. There is a nice option in “Reflection” group call “Metal material” which will help to mimic more realistic metal material. so I check it but be aware that when you check it, it will use “diffuse” color as metal color. so I changed diffuse color to white too.
Note: if you do not check “Metal material” option, diffuse color cannot change the color of your
material. in this case you need to change “Reflection” color.
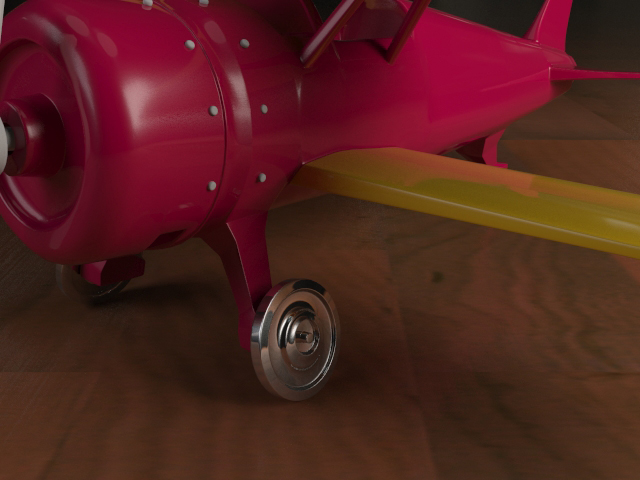
There are small screws around engine of plane. For those I used “Arch & Design” material again. But this time I want use one of its preset settings. At the top of “Arch & Design” material, in the “Templates” rollout choose “Chrome” from list. you can see that material settings will be change. it is almost similar to wheel material but if you notice the BRDF is set to “By IOR (Fresnel reflections) and IOR value is 25. This is another trick you could use for chrome material and almost result is same.
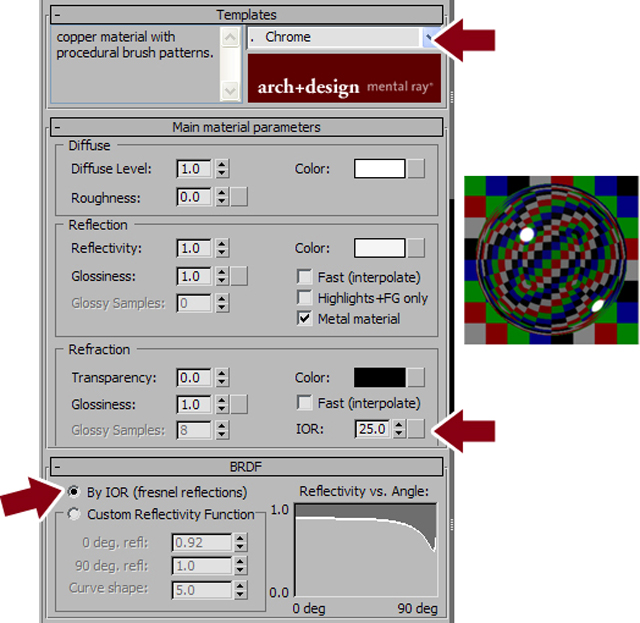
I suggest you to try different presets and look their parameters.
The last part is rendering setup. I haven’t used any special settings that need to discuss about it. I set Final gather as indirect illumination with Medium FG precision. For higher sampling quality I used 4 as minimum an 16 as maximum samples per pixel. In my rendering I use exposure 2.2 so if you see your final result is not similar just change its exposure. I hope you could enjoy of this tutorial. it was short and I couldn’t talk and discuss as much as I like but I tried to show some key points.
Hope you enjoy of this tutorial