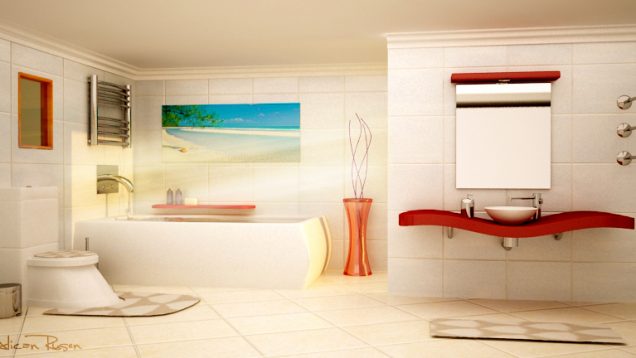
Helena the Archer is a project I made for fun. The inspiration behind her came from Korean online game artworks, where beautiful girls dressed in armor and carrying weapons.
This time I wanted to concentrate on proper texturing and realism. It took me 5 months of my free time to create this scene. My main goal was to recreate the already existing environment in 3d as accurately as possible to achieve a high degree of realism, just like in the movie production. I knew […]
Binah was a difficult and long time consumming project. It was a great challenge for me, technically and artistically. Binah is the third sephirah of the tree of life in cabbala.
This tutorial will covers some of the interesting steps of producing this image. Starting with what sparked the idea, and covering the modeling, texturing, rendering and compossiting. I will also share a few tips and tricks as I show the process.
Hi everybody. In this tutorial we will see how we can design a lovely toon characters scene, light and render it. Also we will see what is composite material and how to use it. You need to know some 3ds Max essentials, but i tried to explain everything detailed. Used 3ds Max 2009, VRay and […]
A couple of months ago, I read the famous comic novel “the top of the gods” by Jiro Tanigushi. I was so inpresssed by his drawings and the story about the first pilgrims in the Everest, I decided to create a picture about mountains.
I made this image with 3dsmax7 and rendered it with V-Ray the background in the image is a photo, anyway I made this Maybach 57 model a while ago but it was rendered at first with a white background and subtle reflections…
Hello viewer My name is Gourav Sharma .3D Asian girl is my 1st attempt to make a realistic looking 3d girl! software i used -3ds max 2008 and photoshop cs3
I will try to show you how I proceeded to get the Hammerburst II from “Gears of War 2” done. So I will try to explain my modeling, texturing, rendering and final compositing work flow for it.
On this project I used maya for the base model, zbrush for details, Photoshop for texturing and matte painting, shave and haircut for the hair and mentalray for rendering.
“I started the torso with a box, trying to get the right subdivisions to form the basic shape of the body. Then I extruded some polygons from shoulders and pelvis in order to create the arms and legs.”
This was a client work, and we ask me to create a simple and modern Bathroom with similar lines as the exterior house, very simple and with a lot of concrete and Wood.