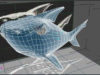
Texturing of Shark
This is completed mesh model. Now its time to put some texture on it.
 |
Hi there, this is where we shopped last time. This is completed mesh model. Now its time to put some texture on it. here is a Max3.0 scene of shark model (selfextracting winrar file). |
|
 |
First, select the body and strip all modifiers (mesh smooth). Just to have a Editable Mesh | |
 |
 |
|
 |
Now when all the faces are selected scroll down Modifier Stack and type 1 in Material ID. Now every face has number 1 material assigned. | |
 |
What we are going to do is to make 4 different materials and to assign every material to deference part of the shark body. Next step is to select polygons (faces) that represent back fin. You will see that material ID for these faces is 1. Change it to 2. Now we have a body that has material 1 and back fin that has material 2 assign. |
|
 |
Like previous step do the same with left and right fin. But for the left assign material 3. | |
 |
and for the right one assign material number 4. Now we have body (material number 1), back fin (2), left fin (3) and right fin (4). | |
 |
Unselect model and down in Modifier Stack-Material select by material ID. ID is 1. And all the faces with material 1 assigned will be selected. | |
 |
While these faces are selected use UVW Mapping modifier. Use Cylindrical mapping method. You see that cylinder direction is left-right, that is because the starting box is modeled in left viewport. |
|
 |
We need to put that cylindrical gizmo in right direction, so select it by clicking on Sub-Object-Gizmo. Click on rotate button with left mouse button and than with right mouse button to open this rotate menu. Rotate gizmo -90 around Z axes | |
 |
And gizmo is placed in right direction. Use rotate tool to adjust it a little bit and than click on fit button in UVW Mapping modifier. This is what you get. See that green line at the top of the gizmo. This is the line where mesh is going to be split when unwraped. You will see this later when unwrap modifier is used. |
|
 |
The main part of the body is done. It’s time to apply a mapping cord’s to fins. Use Mesh select from the modifier list. Click on polygonal selection and Select by Material ID… select material 2. Back fin is selected |
|
 |
Apply UVW Mapping modifier on back fin also. Use cylindrical mapping. You will need to adjust gizmo again like it was adjusted at the main part of the body. Use rotate tool, and fit command at the end. |
|
 |
|
|
 |
||
 |
All the parts are done with mapping and the list of modifier should look like this.
|
|
 |
Click on Edit Modifier Stack and Collapse All. Its useful to use Hold/Yes, because there is no turning back if you do something wrong. Its also useful to save you work as you progress in different names. So you will have a couple of files, and every file is different faze of modeling, texturing, animating… process. |
|
 |
Model is collapsed and there is only Editable Mesh in Modifier Stack. Next step, use Unwrap UVW modifier, and press Edit. A new window will open. |
|
 |
Now this is mess. Click on image to see large one. This is unwraped mesh of the shark. In lower right corner is a drop done many.. All IDs, 1, 2, 3, 4 select only 1
You are selecting that only mesh with material ID 1 is shown. |
|
 |
Now this is a step forward. You can see, this looks like a main body unwraped. It need a little touch up. Use tools in the upper left corner. Move, rotate, scale… Move vertexes to make a clean mesh We mention it earlier, see how the mesh is split at the center of the back of the body. That was green line in cylindrical mapping gizmo. |
|
 |
Now before we go any further lets see how the texture is going to look like. See that red line. That line is border between dark back and rest of the bode that is going to be in light color (white or yellow or something between). Its important that we see that fins are the same color as parts of the body near them, so we do not need to spend time with fins unwraped mesh.
|
|
 |
To make things easier make a Multi/Sub-Object material with 4 materials. As diffuse map of materials use Checker map. Checker map is made of two colors. Every material checker map should have one black and one different color than other material. Assign this material to shark. | |
 |
You should see different materials on body and fins of the shark | |
 |
If you do not see checker material over shark, in Material Editor in every material diffuse map settings check this button. Now you will see that map in viewport. | |
 |
 |
|
| You should see a shark like on image below. But something is wrong with the map at the front of the shark between two nose holes and mouth. Map is strangely stretched.That is because we use cylindrical mapping and this part of the mesh is not covered correctly. | ||
| To fix this use one planar map from the front. Use Select Face in Unwrap-Sub Object, and select those faces. Use planar map to fix mapping of texture on that part of the model. | ||
 |
You will need to work a little bit in Edit UVW’s window to make that texture fit correctly. See how front part (planar mapping) and the rest of the body are not fitting correctly, but there are close. If you analyze a texture we are going to paint on, its going to be just one color, nothing complex. So these two parts not fitting correctly can be used like this. Do not need to work any more on them. | |
 |
After adjusting, moving, scaling…. this is what you should have in Edit UVW’s window. The main body is rotated 180 degrees, scaled down a little and mash is much cleaner in parts where we wont it to be. Below you see that planar mapping part of the main body. At right are fins. Left and right fin are at the top and there are just scaled down to the size to fit in to a border. Later we will just paint a color over them and you do not need to work on them. Below them is back fin. Mesh of this fin is adjusted. There is no need for this because its going to be colored with just one color, but you can se how it looks when its adjusted. While you are adjusting meshes in this window texture is changing in viewports. You can see in realtime how it fits. |
|
 |
When adjusting of unwraped mesh is done (when you are satisfied how the texture is mapped, there are no stretching of the map) take this image it to any painting software (like photoshop). Use Print Screen and paste it in to Paint, now you have an unwraped image in bmp format. Use this image as an guide for painting a texture. It Photoshop use as many layer as you can. One layer is this image of mesh, other is dark parts of the back, other is light painted parts of the body, another is spots….. It will make your work easier. | |
 |
This is map when done. Its not state of the art but make a job done. The important part of the map is border between dark and light part of the map. That border must be in right position. All the rest is up to you. | |
 |
 |
|
| See how the map looks on a model in viewport. After mapping is done use Mesh Smooth modifier. On the image far left you see model with Mesh Smooth modifier and Iterations set to 1. | ||
 |
 |
|
 |
This red image on the left is map used for one part of the eye. Outer layer of the eye is just like any other glass material, and there is one big white part below this red one. And that is the eye done. |
Below are two renderers. Rendering was done in Brazil r/s. There is only one omni light in the scene with noise map in projector slot. Sky light is turned on. Other image has a fog and blue environment color. |
|
|
||
 |
||