Advanced tiling by Matt Vainio
| Advanced tiling: | |
|
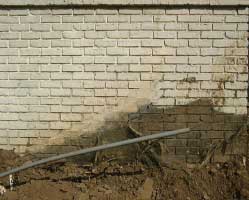
For this tutorial, I will be dealing with tiling textures with a pattern, such as brick. These textures can be especially difficult to tile, depending on the source material. When looking for a source photograph for bricks and textures with an apparent pattern that needs to be preserved, look for/take photographs with as little perspective as possible. This minimizes work later on in this stage of texture creation. I’ll start with a basic brick texture taken from Jeremy Englemans Public Textures |
|
|
The first thing to do is to select a square portion of the brick like the textures in the earlier tutorials. At this step it is important to notice the image pattern and how it would be best to crop it. Here you notice I cropped along the grout lines of the bricks, and the upper bricks are offset from the lower most bricks – so that when the image is tiled vertically I’ll have a better chance of lining the bricks up to look natural. It’s important to select a large enough area so that when the image is shrunk the brick texture feels the right scale in game. For the purposes of this tutorial and the source image, I kept the brick size fairly large. For a more natural brick size, the final image would need to be 128×128 instead of 256×256 to make sure the bricks were at a natural scale. |
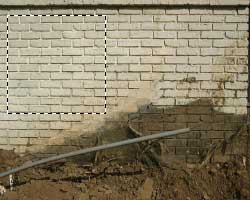 Cropping the section of the bricks. |
|
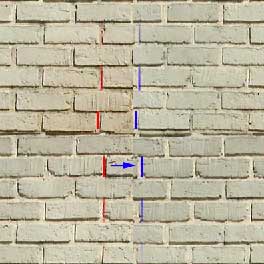
Once we have a section isolated I like to run the offset tool as in the previous tutorials to see what I am working with when the image is tiled. In this case I can see already the grout edge marked in red needs to line up with the grout edge marked in blue. There are two ways of doing this, either by stretching the image slightly wider, or pinching the image horizontally to make it thinner. Think of the outcome of either, the general pattern of the bricks will be more square if I make it smaller, so I will decide to stretch the image some. In general, stretching is a bad idea because you lose image resolution……BUT for most textures I work with, I crop a 400+ pixel square and will do the final resize down to a 256 pixel square – so any detail lost in this small amount of stretching will not matter once the final image is resized. After you are done checking it out, input negative values of offset to revert the image back to normal. |
|
| So looking at the texture again, we notice another problem – perspective on the photograph. The red lines give you an idea of what I am looking at. From here we are going to want to stretch vertically the left side of the image, to try to straighten the image out as much as possible. We are going to want to take care of this problem before touching the previous problem of the grout lines. | 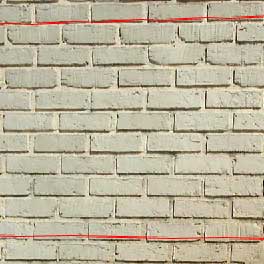 See the perspective from left to right? |
|
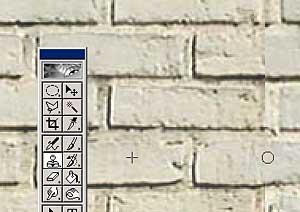
The transform menu is where you will find all the handy tools for fixing the above problems. Go to edit>transform>perspective to start off. |
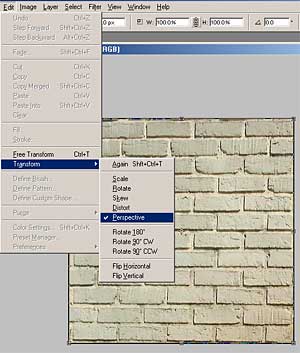 Selecting the transform tool. |
|
After selecting perspective transform, hold down shift and drag the upper left edge upward. This will cause the lower left corner to move at the same rate downward as the upper left corner is moving upward. As you can see, I have moved the points only slightly and now the perspective has been removed. After this, make sure to select the entire image with ctrl-a and then going to image>crop to make sure when you run the offset tile later it does not include the part of the texture you just removed with the perspective transform. |
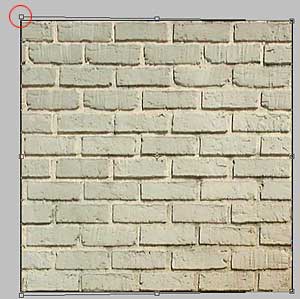 Removing the perspective by using the transform tool. |
|
Now we are going to align up the bricks using edit>transform>scale and pull the right side of the image out, trimming about half a brick width. If you look up four images, you can see how the section I cropped needs some editing for the bricks to tile properly. Since we have removed the perspective, we can now complete this step. To just pull one side, make sure not to hold down shift while pulling the edge of the transform tool. After this, make sure to select the entire image with ctrl-a and then crop the image again like in the previous step. |
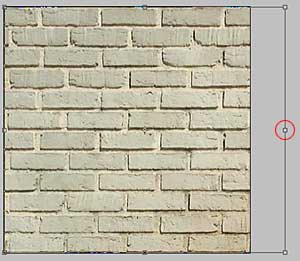 Stretching the brick texture. |
| Here you will want to use steps from previous tutorials and run the high pass filter followed by the offset filter, to get your image to the point where you can use the clone stamp to remove tiling issues. | 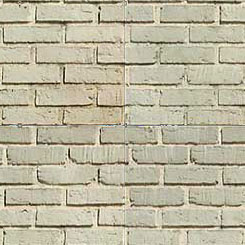 Getting ready to remove tiling by using the offset filter. |
| Using the clone stamp tool on an image with a defined pattern such as brick takes a bit more finesse, but the same technique of defining a clone point and painting over the + edges takes care of that. |
|


About The Author
You might be interested in